click for sample
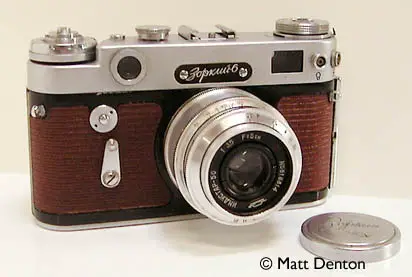
- Produced 1959-66 (1961) KMZ, Krasnogorsk (Moscow), Russia
- Film type 135 (35mm)
- Picture size 24 x 36mm
- Weight 1 lb, 6.9 oz (649.2g) with I-50
- Lens LTM Industar-50 (Tessar formula) 50mm 1:3.5-16
- Filter size
- Focal range 1m to infinity
- Viewfinder coupled rangefinder
- Exposure meter none
- Shutter double cloth curtain
- Shutter speeds B, 1/30-1/500
- Self-timer
- Accessory shoe and PC sync connection
Overview
Yes, exactly, just what I needed, ANOTHER RANGEFINDER. (“Hi, my name is Matt, and, I’m addicted to old rangefinders.” “HI MATT…!” ) Well, I’d been curious about the performance of the Industar-50 lens and though previously reluctant to own one because of its – er – unusual design, I couldn’t pass up the chance when I saw one affixed to this unusual red Zorki 6. The Zorki 6 is the last unique model of the Zorki rangefinders, incorporating all of the things they learned along the way: compact design, wind lever, hinged back, wide rangefinder base, AND strap lugs. No slow speeds or hot shoe though. Now, to be fair, the Zorki 4K is actually newer (production from 1972-77) — it’s an ‘improvement’ on the venerable and long-lived 4, with a hinged back and somewhat dorky-looking wind lever. It also has a wider shutter speed range of of 1 – 1/1000. BUT, the speeds are painted on rather than engraved and wear off easily. And it lacks strap lugs.
Overall the Zorki 6 has got a great feel – nicely compact and balanced, with a short and smooth shutter release stroke. The hinged back makes for easy film loading. The compact design makes it a pleasure to hold. Now, the wind lever sounds like it would be more convenient than a knob, and on a modern Japanese rangefinder like the Konica Auto S2 or the Yashica GSN it is indeed, but the geared lever on this, like that on the FED 3b (it’s nearly identical) and FED 5, actually make me wish for a smooth-winding knob like on a late model FED 2. (That sentence makes sense, I swear!) It’s a longish stroke too, easily 180 degrees, though you can double-pump if you like. Speaking of the FED rangefinders, if you’re familiar, the Zorki 6 feels kind of like a FED 2 with a FED 3 style wind lever.
At any rate, it’s a handsome camera that’s hard not to love, and if you don’t mind the lack of slow speeds it’s likely to become a favorite shooter as it has for many others who don’t want to admit they have a FED 5 in their arsenal.
Repairs
What I thought at first was a clean, functioning classic soon revealed itself as a cosmetically nice old dog needing more than exercise to get it going again. The first issues I saw were that the wind lever was very stiff, and the aperture ring was wiggly. So I removed the top of the camera and lubed the gearing (isn’t that what everyone does when they get a new camera?) but it made only a marginal difference. So on a tip from a fellow ruscam afictionado, I found that loosening the two dark screws that hold down the gearing cover below the wind lever freed up some pent-up tension and let the wind stroke be more relaxed and free. After retightening them and fixing them with some nail polish, now the wind is smooth like butter. And of course I Windexed all the glass while I was in there. Then I packed a little grease into the aperture ring to take up some of the movement, seems better now.
After running some film through it, I saw that it had two other problems: a light leak on the latch side, and an inability to focus to infinity. I started to take apart the lens to adjust it and then got an idea – I tested it with a known-good Industar-26M using frosted glass and a loupe at the film plane and found that it wouldn’t reach infinity either! So I removed the lens mount plate (four screws) and found a paper shim underneath, which I removed to let the lens mount be closer to the film plane, and that worked. Why would the shim hinder and not help? Who knows! As for the light leak, I saw that the camera must have received a ding on the door; the edge of the door by the latch was bent and not mating properly. I gently but firmly straightened it with a pliers wrapped in electrical tape. Now it mates much more effectively. Note that the hinge side should already be sealed with a permanent strip of felt. There is no such strip on the latch side, so proper mating of the door is critical to the light-tightness of the back, but I put one on mine anyway, as I was still having an issue. Just a strip of self-adhesive felt on the door latch side, and it did the trick.
Tips & Tricks
Unlike with most FSU rangefinders you don’t need to cock the shutter before changing speeds, but if like me you have several it’s probably best to retain the habit throughout so you don’t screw up the shutter on your FED 2…
The tripod mount is not the standard 1/4″ mount, but the European 3/8″ mount that requires an adapter, which you can find if you look around.
And for you tinkerers – if you’re attempting to dismantle your Z-6, note that the collar surrnounding the shutter release, and the locknut underneath it, are reverse-threaded. Vertical adjustment for the rangefinder is done by rotating the circular rangefinder lens on the upper front of the camera; horizontal (infinity) adjustment is done with a screw hidden underneath one of the nameplate screws. Another quick note – if you take off the bottom plate for any reason, note that there are two spacer washers on the door side screw holes that give clearance for the door to close properly. They like to fall out and get lost on the floor if you’re not careful.
Related Links
- The very important OWNER’S MANUAL