Introduction

You’ve all seen it, the bits of black crud that are somehow both crumbly and gummy at the same time, sticking to your camera door, the film rails, maybe even your mirror bumper. Nasty stuff that when it gets on your fingers you find it’s about as sticky as roof patch material… (Tip one: try not to get it on your fingers, it will get EVERYWHERE.) The bad news is that you’ll need to replace this stuff if you want your pictures to be free of giant washed out flare spots. The good news is that it’s not so hard. Read this through once, then put on the radio or a movie you’ve seen a hundred times and follow along!
Getting Started
Gather your materials: a well-lighted area; paper towels; jeweler’s screwdrivers; toothpicks; tweezers; cotton swabs; Windex and/or some other grease-cutting solvent; also, a dental pick is good for getting off tough tape or tiny bits in tricky corners. And that’s just for the removal part! Of course that’s 75% of the job. For the new seals, you can use a variety of materials, from craft-store closed-cell foam to prefab kits from some eBay sellers* or Micro-Tools. I’ve used a variety of things, including film canister felt (great stuff, but small), strips of neoprene from cut-up mousepads, “Foamies” (closed-cell foam you can get at the craft store). All good, but I’ve settled on two easy, long lasting materials: self-stick felt, and cotton yarn like they used to use in good old German cameras. Plus Pliobond as an adhesive.
* I do highly recommend Jon Goodman’s (not the actor!) light seal kits, they are well put together with excellent easy to follow instructions. He goes by the ebay handle ‘interslice’.
Special Note about the Example Camera
I’ve chosen a Yashica Electro 35 for the example, it’s pretty typical of a Japanese rangefinder, which is the likeliest camera to need new seals it seems. It’s also very similar in body construction to most SLRs I’ve seen. Some compact rangefinders have their light seals on the camera door rather than in the door mating grooves, I just clean it off as described here and replace with felt instead of foam, which can be too thick and keep the door from closing properly. Mirror bumpers are done as described as well, just more carefully. Be very careful not to touch the fresnel screen. And be very careful cleaning the residue off the mirror as well, I use Windex on a Qtip, it hasn’t failed me yet, but I’ve heard some bad stories.
First Steps
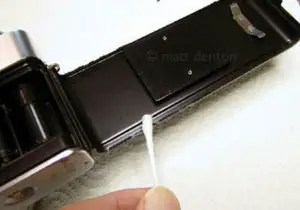
The first thing you have to do is dip a cotton swab in Windex and clean that back door. If it’s still sticky it’s not clean. Then wash your hands.
Now it gets “fun” – scrape off the foam you see, generally by the door hinge (the most important one, and always the first to go), and at the other end of the door, sometimes the trickest to get right because the latch is different on every camera. Remember exactly where it went! Your job is to duplicate it later.
Scraping – especially if you’re careful not to take off all the paint – isn’t always entirely effective. You might need to moisten the residue with Windex or Goo Gone, or enlist a dental pick to get that tape off (the adhesive that affixed the foam). And don’t worry too much if you scratch the paint, that part’s going to be under the felt anyway.

Next
After the scraping comes the cleaning, go over those spots with Windex and make sure there’s nothing left. Take your time. Residue will keep the felt from sticking properly. And make double sure the pressure plate is *spotless*.

Oh Wait, NOW the Fun Part
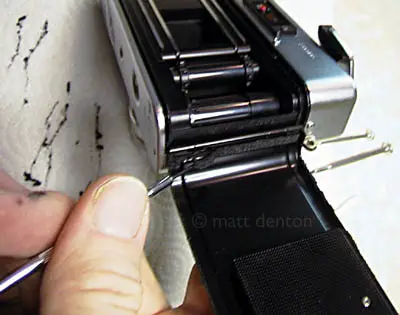
Run your little flat blade screwdriver up the film door mating groove, holding the camera over the paper towel. The first pass is the most productive. Make sure none of this stuff falls back into the camera! Blow it out if it does, don’t touch it if you can avoid it. Sometimes it comes out easily, sometimes it doesn’t. You can even run a toothpick in the groove, flatten it slightly with some small pliers first for best results. Wood is non-marring! A dental pick comes in handy for the hangers-on. NOTE that I don’t try to clean the stickiness out of the grooves, I leave that to help keep the string in place.


Put it All Back!
The felt is fairly easy, cut strips with a metal ruler and a very sharp hobby knife, then cut the pieces to fit the spaces. You can butt pieces together to make longer strips, usually the width is the tricky part, especially with mirror bumpers. It will stretch slightly if you need it to. I use a bandages scissor to cut the length. Snip!

Remember I said I don’t try to sanitize the film door mating grooves, I leave it a little dirty so that the stickiness will help the string stay in place. Between that and compression, I find I only need to glue the ends, which I do with Pliobond. Then I stick it deep in the groove with my hobby tweezers, and hold it there while I run the string down the groove, then tamp it in place. I then cut it to fit and glue the far end. Pliobond is useful but nasty, note I use a toothpick to apply it, I stick the toothpick in the tube so I don’t have to squeeze it. When you do it’s like model glue, it just keeps coming out.


Once that’s done I close the door back to compress the string and make sure I can still comfortably close and open the door. (Once I did take a strand out of the string to make it fit better in a smaller camera. Worked OK.) The two-piece section where the film counter reset button lives is slightly trickier. Take your time, you have plenty of string…
What’s left?
Make sure the door opens and closes properly, then let the camera air out overnight with the door open so no fumes remain inside to cloud up the glass or affect painted surfaces. Should be ready to shoot the next day, take it for a spin and enjoy!
New seals and typical carnage:

Related Links
- For more info on general repair and cleaning see my repair tips page.