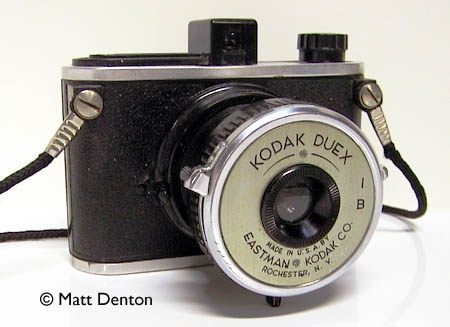
- Produced 1940-42 Eastman Kodak Co., Rochester, NY USA
- Film type 620 rollfilm
- Picture size 6×4.5 (‘half-frame’)
- Weight 13oz (368.6g)
- Lens “periscopic doublet”
- Focal range assume 2m to infinity for most box cameras
- Shutter simple spring w/sliding arm
- Shutter speeds one speed, about 1/30 plus ‘B’
- Viewfinder viewfinder
- Exposure meter none
- built-in neck strap (and how often do you hear that!)
Overview
This was a project camera I got in the mail from my friend Ken Smith who said if I could fix the shutter lever I could have it for what he paid, which wasn’t much. It’s a charming and simple bakelite snapshot camera from the same timeframe as the Kodak 35 RF and shares the body style of the Kodak 35. Almost the exact body, although the Duex is actually slightly smaller than the 35 RF even though it takes the larger 620 film instead of 35mm. The lens & shutter on the Duex screws out on a bakelite tube in an oddly organic way. Its single shutter speed puts this squarely (or in this case rectangularly) in the box camera category. In other words, a daylight snapshot camera, guaranteed to be a conversation starter as it swings from your neck on its built-in string.
The Duex is named for its ‘half-frame’ format; it takes 6×4.5 pictures on 620 film, so you get 16 instead of the usual 12 pictures per roll. But wait! 12 x 2 is 24! Yes, well, it’s not true half-frame, that would be 6x3cm which is closer to panoramic than to ‘ideal format’. 620 means you need to respool 120 film onto the smaller 620 spools, which though relatively simple, is more trouble than most people think it’s worth and is probably one of the reasons classics like these are available for a few measly dollars. When you do respool (see links below), don’t forget to ask for the 620 spool back when you drop off your film!
In terms of film, box cameras were meant for slow film and daylight – if you can find ASA 50 that is about perfect but 125 is good and even 400 can work ok (mucho latitude in Tri-X). Sadly, the venerable Verichrome Pan is now discontinued but Plus-X is great stuff. Agfapan APX 100 is good too.
The lens is listed as a ‘periscopic doublet’, which in this case means that it’s not an objective doublet but has two separate lenses, one on either side of the shutter mechanism with space between. Come to think of it, this is also true of the viewfinder, which is also two separate lenses with space between. I could take this opportunity to point out that what we normally refer to as a ‘lens’ is more accurately referred to as an ‘objective’ which is in turn made up of a group of lenses, but you knew that anyway and of course neither one of us is going to stop calling an objective a lens, so why bother I say. Er, moving on…
Repairs
The screw holding the shutter lever on was broken off in place. While I contemplated how to fix this, I took the shutter housing apart even farther and put a couple drops of lubricant on the shutter hinge and tightened the screw for the I-B lever (it was flopping down into the B position by itself). I also took off the viewfinder and cleaned up the two glass lenses with Windex (don’t lose them if you do this, they’re small!) and the metal plates with Flitz… As for the broken screw, I decided to carefully drill out the shaft with a 1/16 bit (slightly wider than the original shaft), then I cut off a picture-hanging nail to leave the head and about 3/16 of the nail, which I epoxied in place of the missing screw. As long as I’m easy on the lever it should be fine, all the nail needs to do is keep the lever on the wind mechanism.
Tips & Tricks
The lens screws out and though it looks like it would be variable focus, it’s not, it locks into place when fully extended. When the lens tube is all the way out the whole thing is about the size of a small SLR but a fraction of the weight. I tried a few ways of tripping the shutter, and I think the obvious way is the best and least awkward – reach out with the index or middle finger of the right hand and gently press the lever down. Careful of camera shake. The shutter is designed not to trip when the lens is screwed back into the housing. For ‘B’ you move the I-B lever from I (‘instant’) to B before tripping the shutter. Keep the red window away from the sun.
Related Links
- The very thing at Mischa’s outstanding Kodak collection page
- Here it is again at Walker Magnum’s page
- How to use 120 film in a 620 camera courtesy of Brownie-cameras.com
