 If you’re here, you already know that the Yashica Electro is one of the best picture-takers your lunch money can buy. You also know that they’re as common as they are inexpensive, and that they are as likely as not to have at least one age-related problem or another, so pick up a couple while you’re at it — one for parts, one for pictures. On this page I’ll run through a partial teardown so you can see how to get to the likeliest trouble spots, and describe how I fixed them on mine. Light seal replacement is detailed on another page. Let’s get started!
Getting Started
Materials needed: a well lighted area, I also recommend a tray to work in or at least a paper towel to work on, jeweler’s screwdrivers, spanners, cotton swabs, Windex. Possible other materials, depending on what you’re doing: small gauge wire, solder & soldering iron, needle files, black felt or foam, vinegar. Also good to have a lens brush and tissues for cleaning the glass when everything else is done.
First Steps – Top Removal
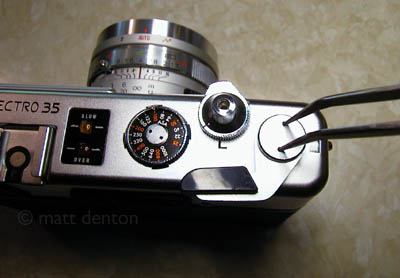
At the very least you’ll want to get in and clean the rangefinder glass. The Electro’s weak spot is a dim rangefinder. The lines are bright and the frame auto-adjusts for parallax, but the field itself is a bit dark, and if its cloudy or dirty it’s just not happening. SO. First, remove the three silver crosspoint screws from the top — there are two on the sides and one on the back under the battery check button. Then get your point spanner out and remove the winder by turning the top counterclockwise. (Shown – sharpened hobby tweezers.) There are a couple other washers and things under it, take them all off and set them aside in a little pile in the orientation in which they came off.
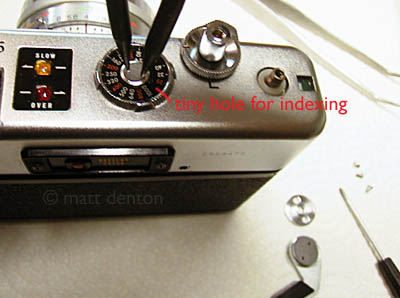
Next, let’s take off the ASA dial. First, set the ASA to 100 for reference, then use a point spanner to remove the center screw. Once that’s out the whole dial lifts off. The dial itself uses a hole and pin for indexing, but the printed wheel is free-spinning. Note the little hole that you can hold with a toothpick or dental pick when you’re putting the screw back, so you can keep it indexed while you tighten the screw.
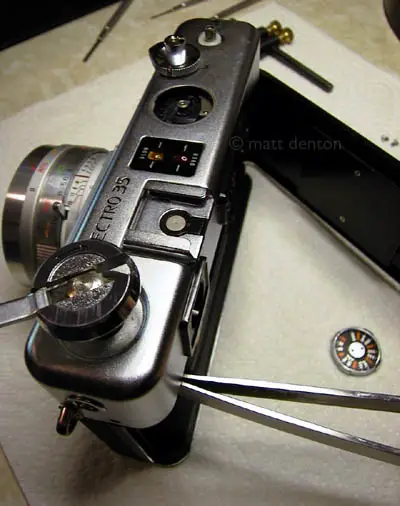
Last we remove the rewind knob, it comes of like almost every other rangefinder and SLR I’ve ever taken apart* — open the back, stick a screwdriver or the back of your tweezers in the fork, and turn the rewind lever counterclockwise to unscrew it. (*except the Konica Autoreflex T, that has a side-facing set screw, don’t ask me why) NOTE – be careful not to close the film door once you’ve removed the rewind lever or you’ll have a heck of a time opening it again!
Okay, Now What?
The top just lifts off. Careful though – it’s attached by the flash sync wire, and also the battery check button isn’t attached to anything, it just falls out. When putting the top back on, put the button in, orient the camera so that the lens is up and slide the top onto the camera to keep the button in place.)
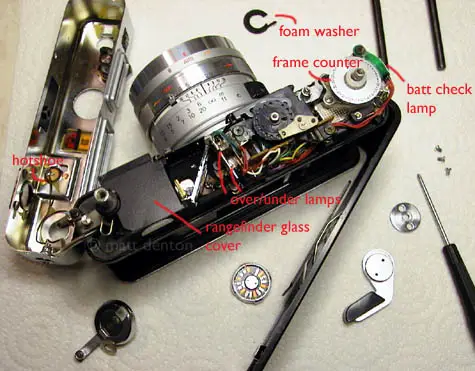
Any number of things can be going on up here. You may need to reglue missing plastic in the top such as the over/under lamp covers or the battery check lamp cover; the frame counter may need adjusting to free it; but if nothing else we can be sure the rangefinder glass will need cleaning. So first remove the ooey-gooey foam washer that keeps light from leaking in at the rewind lever. You’ll replace it later. Next, carefully lift off the rangefinder glass cover, it’s either glued down (later Hong Kong models) or is a big sticker (some earlier models), so be gentle. Next get a cotton swab moist with Windex/Glassex and clean the inside of both viewfinders, then dry them with the other end. I always do the yellow glass too, but know that if you do, you’re doing it at the risk of removing the yellow and rendering your rangefinder useless. Hasn’t happened to me yet but you’ve been warned. Next verify that it’s all bright and clean by looking through it. Then replace the cover: I put a little contact cement (Duro) on a toothpick, then hit a couple key contact spots on the posts (you’ll see them) and put it back. Now it’s time to replace that foam washer: I just cut a piece of black felt about that size and punch a hole in the middle with a hole punch, then stretch it over the lever. You can use foam too but I like felt.
Now put it all back together!
What about the Bottom?
The bottom plate comes off by removing three small crosspoint screws. No seals here but it may be sticky from corrosion. You can loosen and remove corrosion by swabbing it with a cotton swab moistened with white vinegar.
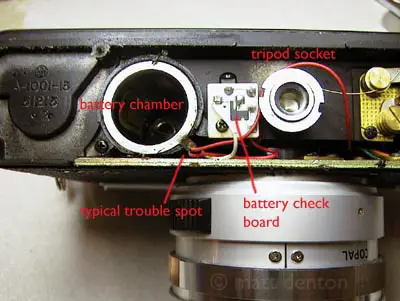
Sometimes an old battery will have corroded the wiring adjacent to the chamber. The ring the wires are attached to floats free, and is contacted by the wavy ring on the battery door. If that ring is missing you won’t have a circuit, I’ll bet you can make it up with some tin foil if you don’t have a replacement cover. If the wires are corroded, you’ll see it right away I think, and will be able to follow it up through the camera body to where it is attached in the top of the camera. Replace the whole wire if necessary.
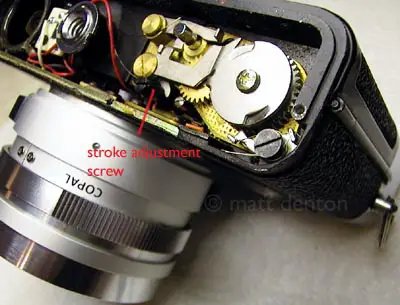
On the winder side, you can observe by winding and firing the shutter whether everything is working OK. I found one where the stroke adjustment screw was not at the proper depth, it should be such that the rewind lever just enters the groove on the rod when the shutter release is pressed, preventing the rod from returning till the shutter is cocked again. Righty-tighty, lefty-loosey.
Ahem – the Shutter?
Riiiiight – the shutter.
Super easy to get to, more so than on many of this style rangefinder, PROVIDED that there aren’t any significant dings in the filter ring. Step one is to remove the trim ring, it’s often in tight and really requires a slotted spanner. If it’s really hard to get in & out because of poorly milled edges, you can put a little synthetic grease on your finger and run it on the edge of the ring before putting it back.

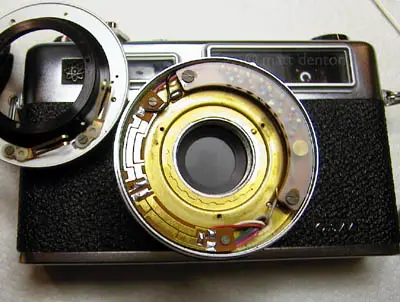
Once the trim ring is off, it’s all cake. The front group, which appears to be sealed as a piece, unscrews as a whole. Set it aside. Now you’ll see the exposed (and hopefully clean and dry) shutter blades, and two sets of three tiny crosspoint screws. The first set, which holds down the filter ring, is uninteresting. The only thing beneath that is the ball bearing that controls the Bulb/Auto/Flash click-stops. But if your filter ring is a mess, this is where you would replace it. The second set, in the black ring, is more interesting because they will give you access to the meter circuitry. Unscrew them and the front of the lens barrel lifts right off. You can clean the circuits with a contact cleaner pen if you so desire, it’s not likely to be necessary. When replacing, the little peg goes at the top.
AHEM – Where’s the Shutter!
OK, right around the shutter blades you’ll see a scalloped ring, that’s actually a retaining ring for the rest of the lens barrel above the shutter. Remove it and swing aside the lens barrel, which will still be held down at one edge by all the meter wires. NOTE – when you put the ring back, don’t overtighten or your aperture ring will be very stiff. Just tighten it enough so that the lens doesn’t wobble.
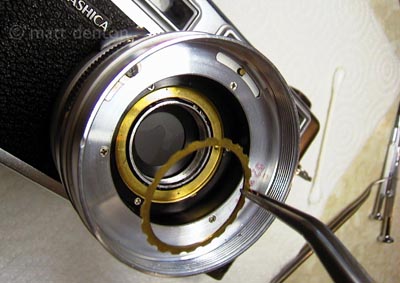
Now you can clearly see the shutter. Here’s what it looks like when the shutter is charged:
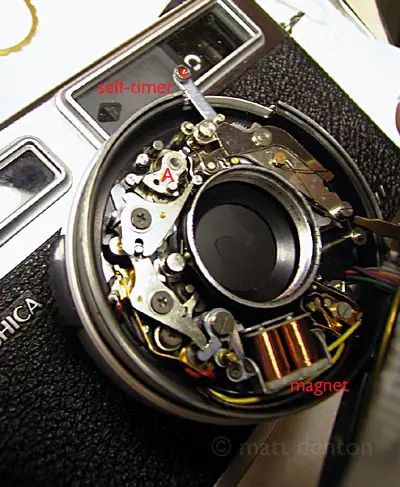
I had a Hong Kong GSN where everything seemed to work but the blades didn’t open when you pressed the release, it just went ‘click’. I checked against another working camera, and saw that on this one the little piece labeled A, which sits against another piece when the shutter is charged, wasn’t *quite* clearing the other piece at release. It wasn’t related to shutter stroke and I didn’t see another way to adjust it so I took a needle file and filed the edge of it just enough that it stayed put when the shutter was charged, but swung free when released. Now the camera works perfectly.
Here’s what it looks like when the shutter has been released:

Final Note
This tutorial is provided as a guide for brave tinkerers and do-it-yourselfers, and of course I assume no responsibility for any unfortunate side effects of following my instructions. Hope this section has helped you get the most out of one of the unsung heroes of Classic Camera History!
Related Links
- For advanced electronic troubleshooting here’s section of the repair manual in PDF form
- My Yashica GSN page
- Replacing light seals in a GSN
- For more info on general repair and cleaning see my repair tips page.