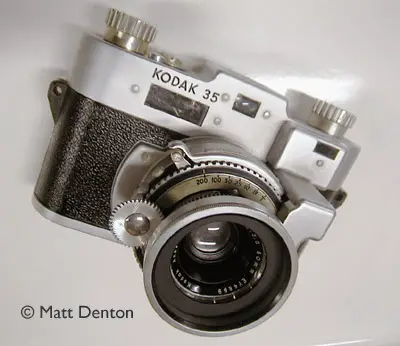
click for sample
- Produced 1940-48 Eastman Kodak Co., Rochester, NY USA
- Film type 135 (35mm)
- Picture size 24mm x 36mm
- Weight 23.6oz (669.1g)
- Lens Kodak Anastigmat Special (uncoated) or Anastar (coated) 50mm 1:3.5
- Focal range 4′ to infinity
- Filter size use Series VI with the 1 1/4″ (31.5mm) slip-on adapter (shown)
- Shutter Kodamatic No. 1
- Shutter speeds T, B, 10, 25, 50, 100, 200
- Viewfinder coupled rangefinder
- Exposure meter none
- Self-timer
Overview
This is an early Kodak rangefinder from the 1940s, pictured here with a Series VI filter adapter (mine came with one, now I have two!). Speculation is that the unusal external RF gearing is a result of a rush to market to compete with the then-popular Argus rangefinders. Basically they took their handsome bakelite-and-steel Kodak 35 and put an external rangefinder mechanism on it to allow it to focus instead of merely having a pop-up viewfinder. The result was a very unique-looking and somewhat collectible if not easy-to-use rangefinder. The back comes off just like on an Argus c-four (literally – it even has the same twist-lock as the c-four). The shutter release is a lever on the front next to the RF focus wheel instead of on top, as if the shutter mechanism was brought over directly from a TLR or bellows camera. (Maybe it was!) Once you get used to that odd placment it gets pretty quick to focus and shoot with the same finger, but until then you end up – I did anyway – pressing the film advance release button (located where the shutter release normally is) instead and mistakenly advancing blank frames. It’s also a bit front heavy and doesn’t weigh well in the hands (but then, that’s somewhat true of the c-four as well). There was an after-market body release attachment available that made it even stranger-looking!
Myself, I find it handsome in its own unique way (described by some as having a face ‘only a mother could love’), and now that I’ve come back to it after cleaning it up and learned a little more about it, I think it’s a fun little user as well. The viewfinder and rangefinder windows, which are tiny, aren’t functionally smaller than on the Argus C3, which I like as well, so there you go.
The camera was available with either a Kodak Anastigmat Special lens or an upgraded Anastar lens as found on its contemporary the Reflex II. The Anastar on the Reflex II is a front-focusing triplet with hard coating, my understanding is that both the Anastar and Anastigmat Special as found here are four-element lenses but not in the Tessar style, and the main difference is that the Anastar is coated. I’ve read that the performance of the Anastar could rival the famed Ektar in some cases. Now that I have one of each I can say that the Anastar is a nice sharp little lightly coated lens while the performance of my fungussy Anastigmat special leaves something to be desired (not necessarily its fault, I can’t seem to get in to clean the innermost element).
Here are the dates of manufacture for the different versions based on info from the “Collectors Guide to Kodak Cameras” (which I don’t have):
1940-48 Kodak Anastigmat Special f/3.5 with Kodamatic shutter
1946-48 Kodak Anastigmat Special f/3.5 with Flash Kodamatic shutter
1947-48 Kodak Anastar f/3.5 with Flash Kodamatic shutter
Repairs
The body cleaned up pretty nice with Flitz metal and fiberglass cleaner. It was pretty tarnished, with corrosion in spots, mostly on the rivets. I’m revisiting my early acquisitions and looking at this camera now I see that it has fungus in the lens and I’m debating whether to attempt to dismantle it and clean it or let it go and let this be simply a display piece. Explains why my test roll was dark and not too sharp, though. Followup: I decided to try it and found the camera surprisingly easy to take apart. The exterior of the lens housing is helical and rotating it moves a lever hidden by the large shroud arm on the right. This in turn moves the rangefinder mirror in a very simple mechanism. You can move the lever out of the way with a little screwdriver and then unscrew the main lens element counterclockwise. Most of the fungus turned out to be on the glass in front of the shutter, not on the lens itself (there is glass in front of and behind the shutter, I’ve seen this on old cameras like box cameras, I think it was just to keep oil off the lens or dirt out of the shutter). Cold cream and Windex, everything else cleaned up nicely but there’s still some haze on the inside of the glass in front of the between-lens shutter that I can’t get to.
MORE notes: a few screws will get you inside the top cap: one each on the knobs, and a couple more for the cap… don’t forget the one on the counter wheel, it’s easy to overlook . Inside is surprisingly spare till you realise that all the work is done outside. Reminds me of the simplicity of the Argus c-four. (Big surprise.) There are three tiny cylindrical bearings barely held in place by three tiny springs just inside the well surrounding where the wind knob sits, don’t lose them, they pop out easily. The springs are supposed to hold the bearings in place but by now they’ve lost all their tension and they fall out. Once inside the top cap you can see that a notch in the spring arm allows you to bend the arm slightly to acheive fine adjustment of the rangefinder mirror movement.
Tips & Tricks
Uh, get used to squinting? Actually, the windows aren’t that much smaller than on the Argus C3, which I consider a classic solid shooter. Closely study the placement and use of the controls before shooting film; they’re unlike any other camera I’ve used or seen. Use fast film or shoot outdoors as both lens and shutter are relatively slow (note, though, that inside it lists Plus X as one of the recommended films). Series VI filters (haze, yellow, etc) and adapters can be had in plenty on eBay for very reasonable prices.
Quick basics – the shutter cocks itself upon winding on, which requires that you press a release button to get to the next frame. Only wind until it stops, not till it pops, which would mean you tore a sprocket hole (yes, I’ve done this, it’s not the end of the world, but now you know). To rewind you pull up the wind knob and turn the knob under the camera until you feel the film come off the captive takeup spool and back into the cassette. Split-screen rangefinder is in a separate window from the composing viewfinder, as on the Argus C3, so you go back & forth a lot.
Related Links
- A little more info on the Kodak 35 RF
- Mike’s got the manual, very helpful if you’re trying to figure this one out.