click for sample
- Produced 1972-? VEB Pentacon AG Dresden, Germany
- Film type 135 (35mm)
- Picture size 24 x 36mm
- Weight 1lb 10.4oz (748.4g) with Zebra Tessar
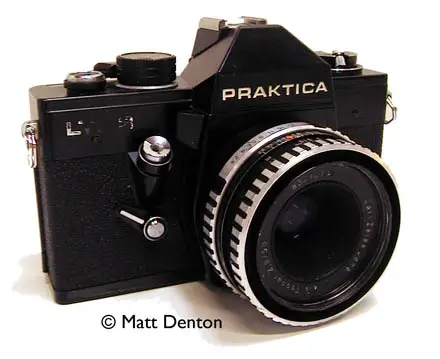
- Lens varied; here with M42 screw-mount ‘Zebra’ Jena Tessar 50mm 2.8-22
- Filter size 49mm threaded
- Shutter metal focal plane
- Shutter speeds B, 1-1/1000, sync at 1/125
- Viewfinder SLR (ground glass, microprism spot)
- Exposure meter TTL CdS
- ASA settings 12-1600
- Battery PX625
- Aperture preview button (activates meter)
- front-mounted shutter release button
- Hotshoe
- fast wind lever
Overview
Solid workhorse of a manual SLR manufactured by East German VEB Pentacon (Dresden). Prakticas in general are well-designed and built to last. This is the last of the LTL series, and while it lacks some of the refined feel of the MTL3 it predates, it’s a great user. Said to be an improvement of the previous LTL but I don’t know in what way.
As with the other later Prakticas, this camera’s best feature is the super-strong shutter. (By contrast, the worst feature of the Super TL) It’s a vertical focal plane metal blade shutter with a very unique and sturdy wind stroke. It’s hard to describe without doing it for yourself but let’s say it feels like a mechanism that knows exactly what it’s supposed to do and does it. With feeling.
Like my other Prakticas it has what I think is an innovative film loading system (“PL”): the wind spool has two spring-loaded bars on it that clamp down on the film as it turns, not unlike the guard bar on a rollercoaster. All you do is line up the sprockets, wind on, and close the back. No threading at all! Very nice. You do have to make sure to slip the leader over a little guide at the bottom of the film plane, you’ll see it.
Repairs
Cosmetic – the LTL3 logo is almost all worn off, maybe I’ll get some Testors model paint and correct that. Also the trim piece is missing from the top of the wind lever, I’ll get around to making a replacement one of these days. Oh, the self-timer appears to be jammed but who cares. Hey, it takes pictures, what can I say?
However, this Tessar lens (pictured) is a bit of a beater, I had to take it all apart to clean the elements and the shutter blades, and the front element has some strange spots in its coating, that wouldn’t come off with Windex, cold cream, or lighter fluid. It’s just the coating though, doesn’t seem to affect the pictures much… except the color pics seem to have a slightly warm cast as if I were using a warming filter. I take it back — I’d be lying if I said it was that easy to get the lens apart. I couldn’t get the trim ring off the front – it was tight and possibly glued – so I actually drilled two indentations in the ring so I could get it off with a spanner. Then I painted the holes with flat lacquer paint. brute force, baby! Sometimes ya gotta do what ya gotta do.
Tips & Tricks
The aperture preview button, which is so close to the shutter release you can rest your index finger on both buttons simultaneously, also activates the stop-down TTL meter. It’s the next best thing to full-aperture TTL metering.
Should probably mention if you couldn’t tell from the picture that the shutter release is on the front of the camera rather than the top. Very ergonomic. And here’s a good one – there is a reminder tab in the viewfinder that pops up to indicate that the shutter needs to be cocked!
Related Links
- Here’s a page of catalog scans outlining the features of the LTL3
- The MTL3 manual, close enough
- Nice page with a history of Pentacon and its ties to Zeiss Ikon et al
- Praktica site with some Links to other sites
- Comprehensive Praktica M42 mount site includes a full model history