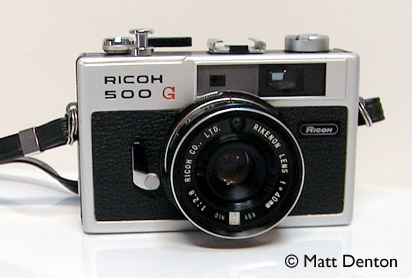
- Produced 1972 Taiwan Ricoh Co., Ltd (mfg. subsidary of Ricoh Co., Ltd., Japan)
- Film type 135 (35mm)
- Picture size 24mm x 36mm
- Weight 14.8oz (420g)
- Lens Ricoh Rikenon 40mm 1:2.8-16
- Filter size 46mm
- Focal range .9m to infinity
- Shutter mechanical shutter
- Shutter speeds 1/8-1/500
- ASA 25-800
- Viewfinder coupled rangefinder
- Exposure meter lens mounted CdS with viewfinder needle (aperture)
- Battery originally 1.3v PX675 mercury
- Hotshoe and PC Sync (syncs at any speed but 1/125-1/500 recommended)
- Self-timer
- Fast-action wind lever
Overview
Here we have another compact rangefinder from the early 70s, similar in size to the Konica C35, and similar in features to the Olympus 35RC or Canonet QL28. In other words it has the advantage over the C35 of having full manual override in addition to the aperture priority settings, and the disadvantage of having no ‘Flashmatic’ setting for automatically relating GN to aperture. You have to manually set the aperture for flash photos. The Ricoh 500G is almost the exact same size as the C35 and like it a black model is also available. But for a change I think the silver one looks cooler. And as with many Ricoh cameras a Sears-branded equivalent can be found, called (I believe) the Sears 35|rf.
It is full manual or shutter-priority automatic, you set the shutter speed and either set the aperture to A for auto or manually select the shutter speed. It’s a perfect size for compact rangefinder, and rather full-featured, the lens isn’t as fast as the Canonet QL17 or Vivitar 35ES but it’s definitely a good performer and if you wanted a full-featured compact rangefinder on a budget you wouldn’t have to look any farther than this. I think the performance of even the 2.8 Hexanon on the C35 is slightly better and more contrasty but then, as everyone who has followed my advice and picked up a C35 finds out for themselves, that little Hexanon is in a class by itself. (This one might be better at wider apertures though.) I should point out that though I keep comparing the two, the 500G is its own design and not a copy or rebranding of the C35 as cameras like the GAF Memo appear to be.
Repairs
Very ugly light seals, fixed with creatively placed strips of Foamies (see your local craft store) attached with Pliobond. CAREFUL with this – I thought I had it all set and found it was still leaking light. I had to go back and put in additional strips of felt at the back latch area. (If I were to do it over I might just use all Presto-felt.) Also cleaned up the glass and metal with Windex and the leatherette with Lexol.
Tips & Tricks
The focus ring is on the very edge of the lens barrel, opposite of what I’m used to with these little rangefinders; usually it’s close to the camera body with a lever or thumbrests to help you focus, here that job is given to the aperture ring and also to the shutter speed selector so practice practice or it gets a little confusing. By the way, the camera does a nice job on the auto aperture setting ‘A’, shutter speed is still manually set.
The manual states explicitly that for flash pictures you need to manually calculate the aperture according to the standard formula ‘flash guide number’ / ‘distance to subject’ = ‘aperture’. I intend to verify this but in the meantime I’d take its word for it. No ‘Flashmatic’ setting here.
Replacements for obsolete batteries such as the once-common PX675 (this one) and PX625 can be got at www.photobattery.com or Radio Shack. In this case, the shutter works using a 1.4v zinc air hearing aid battery, $5 for a pack of 8 at Radio Shack
Related Links
- Ah mon ami francais has the very thing
- Here’s the official manual
- Here’s a better version with scans from the actual manual
