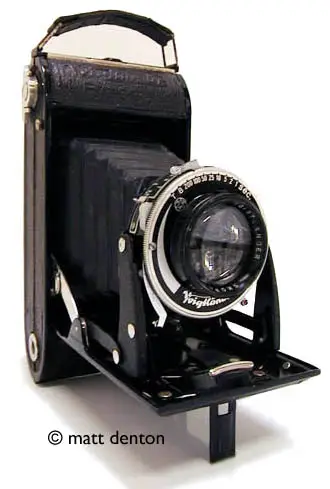
- Produced 1931-49 (?) Voigtlander braunshweig, Germany
- Film type 120
- Picture size dual format 6x9cm and 6×4.5cm
- Weight 1 lb, 5.6 oz (612.4g)
- Lens uncoated front-focusing 3-element Voigtlander Skopar 75mm f4.5
- Filter size
- Focal range 5′ to infinity
- Shutter AGC
- Shutter speeds T, B, 1, 2, 5, 10, 25, 50, 100, 200
- Viewfinder pop-up Albada
- Exposure meter none
Overview
My New Zealand buddy Mike LeFevre made me an offer I couldn’t refuse for this oft-overlooked classic folder; it was a project camera that in the end turned out to be less of a project and more of a camera than I originally expected. A small amount of TLC revealed it to be a good user — well-designed and built to last, with a nice feel and a very handsome vintage quality to the images it produces. Though with a shallow depth of field and being soft wide open, the lens is nice stopped down, and to help the consistency of the images the door is equipped with a large pressure plate to help keep the film flat (often an issue with older 6×9 cameras). It’s a litttle weightier than some other folders its size, but I chalk that up to solid build quality. It’s a sturdy little bugger.
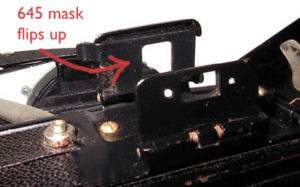
Hard to find out much about these older folders these days, they apparently aren’t as popular or well-known as the later rangefinder-equipped Bessa II. Beyond the build quality, the Bessa 6×9 has some nice design touches that make it stand out from the pack: a door-mounted shutter release lever that retracts when the camera is closed; a self-closing pop-up Albada finder with flip-up 645 mask; and a sturdy spring-loaded release for the bellows, with a unique door-mounted sliding lever. Normally you press the elbows in to fold up the camera, but not in this case:

Another inspired touch, something ingenious that wasn’t apparent at first: the red windows have a spring-loaded cover opened by a twist knob on the back. That’s not the ingenious part. Without the 645 mask in place, turning the knob only reveals the window corresponding to the 6×9 size. When you put the mask in, a tab presses a button in the door upon closing, and it switches automatically to the 645 frame counting. Now that’s good design!
Repairs
Stuck shutter and some bellows leaks, otherwise cosmetically and physically sound. I fixed the bellows leaks with some black masking tape in lieu of actually replacing the bellows, which is a project for another day. The tape is opaque as long as you put it on both sides of the tear, and actually blends in very nicely with the texture of the outside of the bellows. I got a 3/4″ x 50′ roll at the craft store for about $4.50. The stuck shutter turned out to simply be stuck from — you guessed it — thickened grease, and was easily freed with some ligher fluid and exercise. I did not re-lube the shutter mechanism after flushing it.
To get into the shutter simply required removing the two screws holding down the faceplate (one small, one long), and unscrewing the front lens group. Note that the lens is front-focusing; the frontmost element turns within the front group, the rest of which stays stationary in its surround. So to remove the front lens group, set the focus to infinity, then remove the outer shroud (the piece with the limiting tab) by loosening the three set screws that tie it to the front element. Then the whole group can be unscrewed as a piece by gripping with a strap wrench and turning counterclockwise. Once this is removed the front plate can be lifted off. Under it is the shutter speed plate and beneath that the shutter itself and its blades. I cleaned and lightly regreased the back of the shutter speed plate and front plate before replacing them. And of course, took the opportunity to carefully clean the exposed glass.
After reassembly it’s always a good idea to check infinity focus with a ground glass and a loupe with the shutter set on T or B. When you have it at infinity then you can put the shroud back on with the tab touching the limiting post and gently tighten down the set screws. Test again and adjust as necessary.
Tips & Tricks
The finder is supposed to be self-opening: when you lock open the camera front a little pin extends to force the finder cap open, after which the two finder windows pop up. This doesn’t work on mine, the cap sticks shut too tightly for the pin to pop it open, so I just flip it up with a fingernail. Closing the finder cap automatically folds down the two flip-up finder lenses, as long as the 645 finder is flipped down:

The camera front opens with the small button on the camera bottom, and closes by pressing the large door-mounted slider under the lens. Shuttter cocks manually with a lever on the shutter, and is released from a door-mounted lever with the left index finger. Red-window frame counting as I mentioned, and the winding is done with a flip-down ‘key’ style winder rather than the later knob.
For cameras like this you should learn zone focusing. Voigtlander made it a little easier for you in this case with a couple of symbols, their own little standard that was still present on the Vito II. When stopped to f8 or better, you can set to the triangle for objects in the 8-16 foot range, or the circle for 20 feet to infinity. There is a handy little depth of field chart on the back. Either way, it’s probably a good idea to get an accessory rangefinder like the old Ideal or Kodak pocket finders, and stop down when possible for deeper depth of focus, the more the better according to the chart. When I looked at my test roll I thought I had adjusted the lens incorrectly, it turns out my distance estimation is not as good as I thought. Plus, when you’re trying to handhold at 1/25 while it’s starting to rain, and you’re by the side of the road with your kids in the car and your engine running, I suppose you’re lucky you can remember to advance to the next frame let alone calculate distance and depth of focus in your head…
LASTLY, and this is basically speculation based on the few Voigtlanders I have, but it looks like these particular German cameras with their large 3/8″ tripod threads actually came with tripod bushings for 1/4″ in them so you don’t even notice they’re there. Can this be true? I have one in my brillant, and both of the sockets in the Bessa 6×9 have them. What a concept!
Related Links
- Renaissance woman Karen Nakamura has a nice page on the Bessa on her excellent site
