- Produced c 1915 Conley Camera Co., Rochester MN
- Film type 5 x 7 sheet film
- Picture size 5 x 7
- Weight
- Lens various
- Focal range about 7 feet to infinity
- Filter size various
- Shutter various
- Shutter speeds various
- Viewfinder ground glass
Overview
The FUNNY thing…
The funny thing is that years ago, when ebay was new, I created an account with the sole intent of searching for a large format camera like a Crown Graphic, which I shopped for but never did buy. I did briefly toy with the idea of building my own camera from a Bender Photographic kit, back when they were a reasonably priced alternative to a used camera. But then I put off the idea long enough that I completely forgot I had an ebay account, until much later when I went to buy my first enlarger and realized I was already in the system. What! How did they know who I was? It was almost like they were just waiting for me. (Little did I know how familiar I would get!)
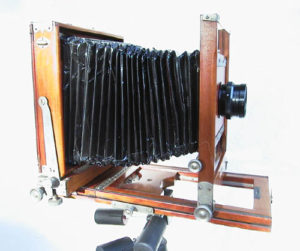
SO about 7 years — and 100 cameras later — I have now my first bona fide large format camera, a very handsome 90 year old Conley 5×7 that will be a restoration and learning project. I really wanted an old wooden view camera that would be like a piece of furniture, a throwback to an era of handcraftsmanship and artisanry, when a camera was a real handmade magic box. It weighs a good few pounds, I’m more glad now than ever that I bought my super duper Bogen tripod and head thinking that I would eventually get a large format camera!
This wonderful website shows a very similar camera called a BW which is nearly identical to this model in many ways, but the camera I have is actually stamped C1 on the underside. The logo too is different, but otherwise this is much like the BW model.
It’s a field camera, which means it folds all up into a boxlike configuration for “easy” carrying, as opposed to a studio camera or rail type, which is less portable. On the other hand, field cameras generally have less movements as a result, though this one has quite a few: rear tilt and shift, front rise, and both the front and back move in and out. There are two bubble levels built in, one on the middle of the base and one on the side of the rear frame.
Use of a view camera generally involves focusing your subject on the ground glass, using the shift and tilt of the front and back to alter the perspective of the film plane. Once it’s focused and you check the exposure, you insert your film holder, remove the darkslide, and take your photo. In my case it’s tres old school with no shutter, just the lens cap since I don’t have the original lens/shutter. Instead I bought a 210mm Industar-51 that you normally see on the old wooden FKD Russian portrait cameras.
More later as I get it fixed & take some picutres with it!
Repairs
Much to do with this one. It arrived with bellows in disrepair, a missing ground glass, and some signs of use and abuse that would need correcting. (The film holders were in excellent shape however!)
My first order of business was to repair a missing alignment pin on the camera back. The wood was broken out so I found a nail with a similar diameter as the other 7 pins, tapped it in the groove left by the missing pin, clipped it to the right length, filed the end, and then filled the broken wood with wood filler, which I later sanded, stained, and sealed to match the beautiful cherry as best I could.

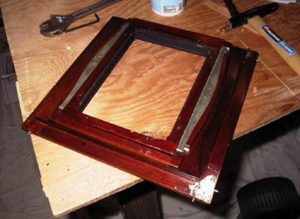
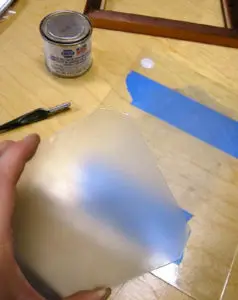
The next order of business was to replace the ground glass. Or just “place”. I went to a second hand store and picked up a few 5×7 frames — just in case I ruined the first two — and an 8×10 frame, all with glass intact, for less than $5US. To begin the process, I took a rubbing of a corner of the inset part of the camera back to get the angle of the clipped corner of the glass. (Not all ground glass have clipped corners but this one does, probably to allow air to escape as the bellows move in and out.) I used the rubbing as a template to mark the corners of the 5×7 glass I was going to use, which I scored with a glass cutter. Then I carefully broke the corners off by laying the score line over the thin metal straightedge I was using, and pressing hard with a leather-gloved thumb. (Be *very* careful when cutting glass, even if it doesn’t break it leaves very small grains of glass dust that need to be carefully swept into the trash so they do no harm.) Once I had the back in the right shape it was time to frost one side. Using the 8×10 glass as a platform, I ligthtly smeared valve grinding compound (another $5US from an auto parts store) on one side of the 5×7 glass and rubbed it in circles on the 8×10 glass until it was sufficiently frosty, which took about 15-20 minutes. Putting blue painter’s tape on the back of the 5×7 helped me grip it as I moved it around; surgical gloves helped save my skin. Next, cleaned up the glass first by wiping, then with Windex (Glassex). Then a few ruled pencil lines and I had me a ground glass!

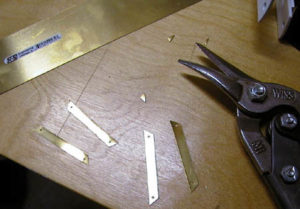
Now how to hold the glass in place? Well I had a picture of another Conley to go from, so decided to match as best I could the original look and went to the hardware store for a piece of sheet brass (in the paint section, about $3US for a 2″ by 12″ piece). Measured the holes and the width of the strips; marked the strips on the sheet and cut the holes first using my brand new drill press (I’ve always wanted one, and this made a good excuse! On sale for $84US at Sears on the day I went to look, only fitting eh.) Once the holes were drilled, I cut the strips with tin snips, clipped the edges as a decorative element, and hand bent them to the right curve.

I used little pieces of cardboard to shim them against the glass so that there was some cushion there, and screwed them in place with 8 little screws from my ‘boneyard’ (camera parts box). Now we’re getting somewhere!

Ah the lensboard thing. With a large format camera, you don’t change lenses, you change lensboards (same as on my enlarger). With the lens (and shutter) mounted in it. Here the lens was missing so all I was left with was the board, which was a perfect template for a new board. The ‘lip’ on the front is the important measurement so I went with some nice looking 1/2″ plywood that I had left over from my big playroom bookcase project, cut the rectangles with my table saw and then rabbited the edges on my router table. I could have simply used some masonite cut with a utility knife but I wanted to get the look right. I cut the holes with my drill press and an adjustable hole cutter slightly large, put some self-stick felt in the hole and screwed the lens into that. After I stained them cherry and sealed with some polyurethane that is.

Whew. Oh right the bellows, which really just need replacing. Well after buying the camera, the lens, and the drill press (doh!) I couldn’t really afford that right away, so I did the (nearly) unthinkable. Knowing that the inside was sound I went back to my local hardware store which, yes, for me is like Cheers to my Norm, and bought a big $5 roll of BLACK DUCT TAPE and then while watching the surprisingly creepy Metallica documentary “Some Kind of Monster” on VH1 proceded to cover the entire bellows to arrive at the Frankenlovely camera you see here.

And then I bought another lens to go with it. 😛
Tips & Tricks
None yet!
Related Links
- J & C Photography (great store!) sells sheet film in many sizes among other things…
- Another great store, Freestyle Photographic has good prices on film and darkroom supplies