click for sample
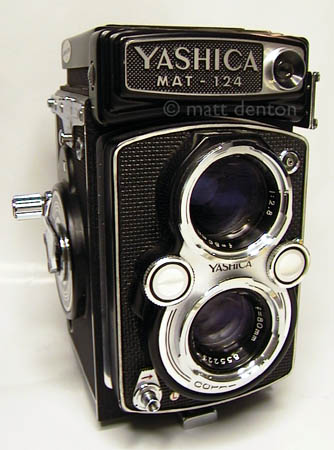
- Produced 1968-71 Yashica Co., Ltd. Japan
- Film type 120 or 220
- Picture size 6cm x 6cm
- Weight 2lbs, 6.8oz (1,100g)
- Lens coated 4-element Yashinon 80mm f3.5-32
- Filter size Bay I (Bayonet type I) 30mm
- Focal range 3.5′ to infinity
- Shutter Copal SV
- Shutter speeds B, 1-500
- Viewfinder TLR
- Exposure meter CdS (match needle)
- ASA range 25-400
- Battery type PX625 1.3v mercury
- M/X Sync plus accessory shoe
- Automatic frame counter
- Self-timer
Overview
Well-designed and well-machined pro-quality TLR, with a classic look and solid feel. It is the forerunner to the well-known and wildly popular 124G, the last of a dynasty of quality Yashica TLRs and the culmination of all that came before it. Before them – among others – came the 12 (120 film only) and 24 (220 film only) but both the 124 and 124G take either 120 or 220 film. You reposition the film pressure plate to tell the auto frame counter which number to count to.
Where the 124G is a slick, all-black monster of professional goodness, the 124 is a more refined-looking instrument, with chrome brightwork and pebbled covering. Until I held them both together I would have said the differences are largely cosmetic, but using them side by side reveals that there were a host of small refinements made to the G model besides the all-black finish and the reported gold-plated electrical contacts. A couple that are not obvious at first glance: the G’s pressure plate is not removable, it just slides up to switch between formats; and it has a film reminder on the focus knob. It is also silent where the 124 has a zippy ratcheting noise when you wind it. Still, they are essentially the same camera where it counts — the lenses, bodies, and shutters are identical. However, I have heard that the 124G, particularly the later ones, may be less robust internally, with more plastic and brass parts than the 124. Both are apparently occasionally prone to film spacing issues.

One other thing I did notice was that the light seals on the 124 are a mix of black string and thick foam (which does eventually needs replacing), while the later 124G has only foam, no string. Still, the lovely Yashinon lenses are the same in both cameras, with a beautiful purple coating and a matched viewing and taking set to boot. I have heard that the later 124G lenses weren’t made to the same tolerances as the earlier 124 and 124G Yashinons, that also is hearsay, I have no way of confirming that.
And for the record, next to the two 124s the Yashica D is clearly a budget model, even if the lenses are the same. Possibly the better bargain for it, especially if you don’t need the built-in meter. A sharp Yashinon is a sharp Yashinon.
Nice features of the 124: self-cocking shutter and automatic frame counting. Wind forward (clockwise) to wind the film, backwards to cock the shutter. Easy! The wheels between the lenses are for setting the aperture and shutter speed, both of which read in a little window on top of the viewing lens, so you can see the settings while looking down on the the camera. Very cool design. The CdS meter turns on when you open the hood, which thankfully opens and closes as one piece. I’ve heard that the switch in the hood is the first point of failure for the meter so check there first if you’re having issues! Set the ASA with the wheel on the top of the camera; match the needle with the red circle by changing the aperture and shutter speed.
One common complaint on the Yashica Mats is the placement of the M-X switch, which is a lever that is adjacent to the aperture thumbwheel. It’s very easy to accidentally move the lever when adjusting that wheel, causing your electronic flash to be out of sync. Some people go so far as to tape over it.
Repairs
Very clean, focus just slightly resistant, I won’t say stiff. Just not as smooth as the D and also the 124G I played with. Probably just a little thickened grease. However – when I got it the shutter just went ‘click’ and the blades wiggled but didn’t open. Sometimes the blades stick from sitting too long (years? decades?). I took off the rear lens element and gently poked the shutter blades with a toothpick and snap they were free. Good as new for a short time, then they froze again. I ended up removing the taking lens elements and cleaning the blades with Rosonol (lighter fluid), then worked them till they were clean. Taking off the rear element is obvious, it’s got a spanner ring to expose the single element. The front element removal is also obvious, it too is held on by a spanner ring. However, I couldn’t figure out how to get the middle group out and couldn’t find the info anywhere. I figured it out and I’ll tell you so you know: the middle group is set into a threaded ring that looks fixed but actually unscrews counterclockwise as a whole. It’s the black ring beneath the front element. Nothing to grip, I just used the pressure from my surgical-gloved fingers.
I also removed the top and cleaned the filthy fogged mirror with Windex, and replaced the crumbly light seals in the top and bottom of the doorwith sticky-back black felt, as well as the strip next to the meter which disintegrated when I removed the viewfinder.
Tips & Tricks
Film loading is as follows: turn the large wheel on the camera bottom counter-clockwise to unlock the pin-and-hole film door lock. If necessary switch the pressure plate to read either 120 (green) or 220 (red). Move the empty spool to the top takeup position, put the film in the bottom, draw out the leader and insert into the takeup spool. Then wind until the large arrow on the film lines up with either the green triangles on the camera sides (a little hard to see) or red triangles by the film rails, then close the back and lock the bottom. Turn the crank clockwise until the S becomes the number 1, then backwards till it stops (not far) to cock the shutter. Advance locks on the next frame automatically after firing and winding on in similar fashion — wind clockwise till it stops, then counterclockwise till it stops. It becomes a very natural quick motion in no time at all.
Related Links
- Mike has the manual
- Karen Nakamura’s page on the 124
- If you’re in need of a repair or CLA then Mark Hama’s your man.