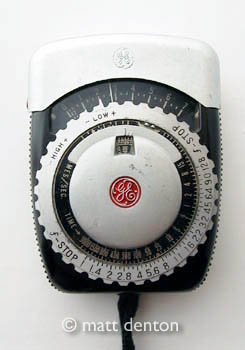
- Produced GE, West Lynn, Mass., USA
- Meter type reflective (can do incident with attachment)
- Readout match needle with over/under indicators
- Cell type Selenium
- ISO range 2-1600
- f-stop range 1-128
- Shutter speed range 120s – 1/3000
- Weight 6oz (without attachment)
- high/low sensitivity ranges
- optional incident attachment
- Close Cousins: GE PR-2, PR-3; Leningrad-2
Overview
Sturdy and elegant little workhorse of a meter. The PR-1 quickly became my favorite companion when carrying old meterless cameras. I even bought a backup in case something happened to the first one, I liked it so much. Between the two I have one incident attachment which I have yet to use. I briefly owned a PR-2 but it wasn’t as elegant a design and so sold it. Here there’s no mistaking the meter reading from the “meter with a memory”, a trap needle mechanism locks the reading in place when you release the button.
Usage
Set the film speed with the inner wheel, it shows in the little window. Make sure you’re looking at the Time range at the bottom of the wheel and not Frames/Sec (aka Cine, for movies). Then point the meter at your subject, press the button on the side, and release when the needle stops. Turn the outer wheel to match the large pointer with the needle and then read across the matched f-stops with the time on the inner scale to get your exposure. Pointers next to the main pointer show +1 and -1 at a glance. For low light turn the outer wheel counterclockwise until a second trident indicator pops up to replace the first and read the same way. Turn clockwise to get back to the ‘high’ setting for most outdoors and normal light. It makes sense when you see it and play with it a little, and after just a bit of practice becomes very quick and easy to use. It’s sturdy too, the manual says it’s made of fiber-impregnated plastic resin. Just a brilliant little device.
Repairs
One of them appeared to be inaccurate, I dismantled it to clean and lube the pivot of the galvanometer and it is now in step with the other. Cleaning the outside of the cell was probably helpful too. I used Radio Shack TV Tuner lubricant which comes in a spray can to lube the galvanometer.
Tips & Tricks
The removable top in the picture turns this gem into an incident meter, where you point it towards the light from the subject’s point of view. I use it mostly as a reflective meter.
To calibrate the 0 setting, put the meter on a flat surface, cover the lens with your hand and press the button. If it doesn’t go to 0, adjust the screw on the back with a screwdriver, it takes the slightest turn to change the 0 setting so don’t overdo!
Related Links
- The manual is online here at Camera Manuals Online — great site!
- Butkus also has the manual