click for sample
- Produced 1932-? Agfa Ansco Corp, Binghamton, NY USA
- Film type D6 (116) rollfilm
- Picture size 6.5×11 or 6.5×6.5
- Weight 21.8oz (618g)
- Lens single-element meniscus
- Focal range assume 2m to infinity for most box cameras
- Shutter simple spring w/sliding aperture disc
- Shutter speeds one speed, about 1/60
- Viewfinder two ground glass screens (reflectors are polished steel)
- Exposure meter none
Overview
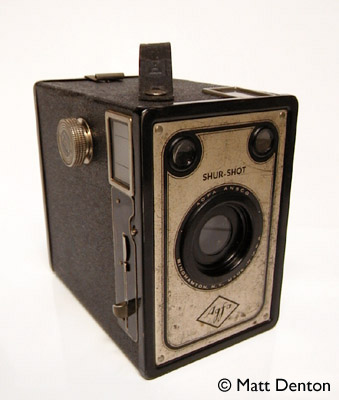
This American made box camera is the model D6, which takes 116 film, no longer available except maybe through FilmForClassics. Picture size selection (square vs. rectangle) is done by flipping some metal ‘wings’ down or up inside the back of the camera (on the pullout part known as the ‘cone’). Operation is super-simple, just aim the fixed-focus lens at the subject, composing on your choice of landscape or portrait format ground glass, and click the shutter.
Agfa-Ansco made box cameras in both D6 (116) and B2 (120) format, and it’s hard to tell the difference unless you see it say D6 or B2 somewhere on the camera. You can almost tell by the proportions though…the D6 models are taller to accommodate the wider aspect ratio of 6.5 x 11, which looks closer to the aspect ratio of a 35mm neg than the more square B2 models whose aspect ratio is 6×9. Between this and the lower-end Cadet, this is definitely the one to get as a user, and it can usually be found for $5-$10 US in good working condition.
There are three controls on the Shur-Shot: ‘Shutter’ (shutter), a tab marked ‘Time’ which when you pull it out equals a ‘B’ setting (shutter is open until released), and another tab marked ‘Diaphragm’ with two detents, one marked ‘filter’ which puts another piece of glass between the lens and the film, and another which gives a slightly smaller aperture. So there are actually two ‘aperture’ settings, large and small. In my test I couldn’t tell the difference between the filter setting and the normal setting. Lightweight and simple (it’s essentially a cardboard box with a very simple shutter and lens), this looks like a fun user camera in the experimental category of pinhole cameras, Holga and Diana cameras.
This camera was a gift to me from a co-worker whose old Canon EX EE I cleaned (nice camera, by the way!). I told him I was collecting cameras and he brought the Canon in to show me – he had just bought it from a student who was leaving town and was looking forward to trying it out. I thought it was pretty cool and in very good shape and offered to take it home overnight and clean it up for him so he could use it. About a month later he asks me to come by his office for something he picked up for me at an estate sale. And here it is!
Repairs
Just a little Windex on the glass, and Lexol on the leather. Actually it was kinda filthy. Then I got carried away and took the thing apart (you know me) to clean all the glass on the inside and near the shutter. Taking it apart was as simple as it gets, just pop the metal front (carefully) off the holding pins. A word of caution: don’t clean the viewfinder glass on the inside! I started to and then realized I had just removed the registration marks for framing the 6×6 pictures! Well, a ruler and a fine Sharpie pen fixed that.
Tips & Tricks
To get the sample picture above I had to convert this to take 120 film. Here’s exactly how I did it. Note that it was problematic after all – though the numbers lined up in the red window they didn’t correspond to the proper distance between frames and they ran together about 1/2 turn. I’m not sure how to account for that except to count the number of turns on a regular TLR and not look at the red window… Otherwise it worked great except for a little light leakage at the film wind knob!
This is strictly a handheld camera; there is no tripod mount, just a cute little handle on top. Don’t forget that you need to pull out the film wind knob before you can get the ‘cone’ out. The lower red window is for 6.5×11 frames (6×9 on the 120 model), the upper and lower are for 6.5×6.5 (see Box Camera 101). And don’t clean the inside of the viewfinder glass. I got decent results with 125 speed film for this one though I think slower (ASA 50?) was used more often back in the day. It’s pretty much a daylight-only camera, which is ironic a bit since the sun always seems to glare on the tiny view window, requiring you to constantly shade it with one hand.
Related Links
- Merrill Photo’s Junkstore Cameras (great site) has a review of the Agfa Shur Shot
- Not to mention the conjoined Box Camera 101 – a must
- An insider’s view of Agfa-Ansco (PDF) from one who lived it, the late Ira Current. Fascinating…