click for sample
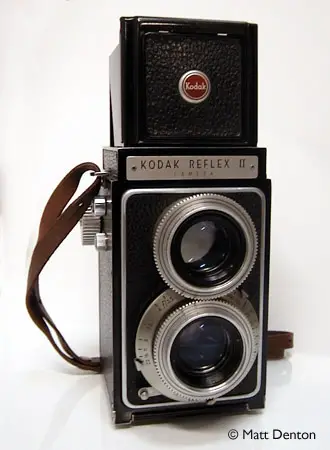
- Produced 1948-54 Eastman Kodak Co. Rochester, NY
- Film type 620
- Picture size 6cm x 6cm
- Weight 2lbs, 1oz (935.6g)
- Lens (taking) 4-element coated Kodak Anastar 80mm f3.5 (stops to f22)
- Filter Size 1 1/2″ push-on (38mm)
- Focal range 3.5′ to infinity
- Shutter Kodak Flash Kodamatic
- Shutter speeds B, 1/10 – 1/300
- Viewfinder TLR
- Exposure meter none
- Self-timer
- Syncs with Kodak Reflex flash
Overview
No cheesy Ansco Rediflex this, the Reflex II is a well-built and well-designed American TLR, very similar to the Ricoh Ricohflex, with geared, front-focusing, pin-sharp, nicely coated Kodak Anastar lenses and a reasonably fast shutter. Notable for being the first TLR with a Fresnel lens in the viewfinder, soon adopted as standard on many TLRs. Including, of course, the many Japanese TLRs that began appearing in the mid-50s, essentially killing the market for American-made TLRs.
The earlier Kodak Reflex (1946-) was similar except it had a slightly slower shutter (2-200) and ground glass instead of a Fresnel lens so the viewfinder wasn’t as bright. I understand that the Fresnel viewfinder was available as an upgrade ($15? at the time) to make your Reflex I into a Ia. The original Reflex also lacked automatic frame counting, and though it was available with the better Anastar lenses is frequently found with the lesser Kodak Anastigmat lenses. I don’t know if the Anastigmat was coated or not, I don’t think so though, as it’s not on my Kodak 35 or Vigilant Six-20. Both versions of the Reflex are very worthy starter TLRs and available relatively inexpensively, this one being obviously somewhat more sophisticated than the original Reflex. Another note I have from my service manual is that the Reflex II (at least the later ones) has a more robust film spool roller. Apparently this also was an available modification to upgrade the Reflex I and the early Reflex II ‘to avoid possible film winding problems’.
This camera is full of nice design features: shutter is single-lever as on the very similar Ricohflex, to cock the shutter move the lever clockwise, then move it counterclockwise to fire. The aperture indicator has detents (click-stops), which is actually unusual (I’m not sure why I don’t see that more on folders and TLRs) but a nice touch. On the other hand there aren’t any on the shutter speed selector. Odd. Self timer is a little button lever at the bottom of the shutter ring that you move clockwise till it stops, then press the shutter release to set. Another interesting thing is the presence of a second tripod mount on the side, something I’ve not seen on a square format camera and I’ll guess it’s so you can put the camera at eye level and sight it sideways, another helpful feature. This is also one of the few TLRs I’ve seen with matching viewing and taking lenses (the other is the Walzflex). Both are hard-coated front-focusing Anastars, which I’ve read are a near-rival to the famed Ektar of Speed Graphic fame. Usually on Twin Lens Reflex cameras the viewing lens is a lesser quality lens that matches the taking lens’ focal length and approximates its field of view. I can personally attest that the Anastar on this camera is one of the most brilliant lenses I’ve used, you can see the difference in color quality and sharpness right on the ground glass. It’s the main reason this has quickly become one of my favorite users.
Other notes: Solid construction, cast aluminum I believe, not like some of its plastic contemporaries. The case, unusually, is leather-coated steel in the surround with a leather frontispiece that conveniently snaps off altogether rather than simply dangling as dead weight. Focusing is feather-touch; the aluminum gears are lighter and move easier than on the all-steel Ricohflex (though I bet if I cleaned and lubed the Ricohflex’ gears they’d turn easier). I was surprised to see automatic frame counting. The ‘red window’ has a spring-loaded cover so after you peek to see if you’re on #1 there’s no accidentally forgetting to close the window and potentially fogging your super-sensitive pan film. The viewfinder is bright but lacks the parallax grid I’m used to seeing. I could probably lay one out with graphic design tape if I wanted to.
The bottom line is that this is a great high-quality camera that is a pleasure to use and takes fantastic pictures. Given the choice I would actually choose it over the nearly identical Ricohflex even though it requires respooling onto 620 rolls. Unless I needed a flash, that is. The one true drawback to the Reflexes is that they don’t use a regular flash, they used a proprietary Kodak Reflex flash that used bulbs. Hope that’s not a deal-breaker for ya.
Repairs
The shutter is a bit wonky, it doesn’t always stay in place after cocking. I’ll try cleaning it and seeing what happens. Here’s the schematic I’m working from. There is a button missing on the left side, though the mechanism is intact, and I’m not sure what it does as all the other functions are accounted for…?
Repair Followup: I cleaned and then lubed the shutter parts with a thin lubricating liquid I found at Radio Shack – it may be the only time that mere cleaning of the parts didn’t adequately free the movement of the mechanics. Getting the lenses back together was a royal pain, I have to say… thanks to Rick Oleson for his help in this tricky matter. One tip – I found that putting the shutter cover plate back on too tightly can cause the shutter to hesitate. PS that ‘missing button’ is actually the flash attachment hole.
Tips & Tricks
Requires respooling of 120 film onto 620 spools, a 120 spool will absolutely not fit. See links below for tips, it’s not only not difficult, I think it’s rather trivial. Essentially you put the 120 film and an empty spool into another rollfilm camera that doesn’t have auto frame counting and wind it all the way through without tripping the shutter. In a changing bag, hand-spool this roll back onto a 620 spool or if you have a 620 rollfilm camera without frame counting (like the Plenax PB20) you can just wind until you get past the paper leader to the film and transfer the spools to the second camera to complete the respooling. Probably do a few at a time if you have the empty spools so you’re not stuck in the field with a 120 roll and no changing bag…
On loading the camera: put an empty 620 spool in the top (takeup) position, thread the film through the large slot through the small slot, wind on a little and put the film spool in the bottom, close the back. Advancing the film requires you push up the lock release button which is located above the counter window. Advance the film till the number 1 appears in the red window, then turn the smaller knurled counter advance knob clockwise until the number 1 appears in the counter window, at which point it should stop automatically. To advance to the next frame you push up the lock release and wind on. When you’ve exposed 12 frames, the number 0 appears in the counter window and the film wind will turn freely so you can wind the film completely onto the takeup spool.
Related Links
- The incomparable Rick Oleson has a great article on the American TLR
- Excellent fully illustrated tutorial for respooling 120 film
- More info on Fresnel Lenses