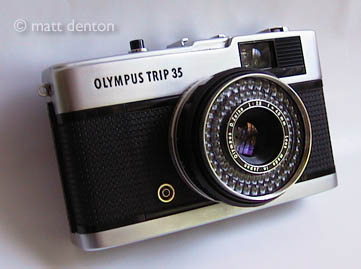
- Produced Olympus Optical Co. Ltd., Tokyo, Japan
- Film type 135 (35mm)
- Picture size 24mm x 36mm
- Weight
- Lens D.Zuiko 40mm 1:2.8-22 (4 elements in 3 groups)
- Focal range 3′ to infinity
- Filter size 43.5mm screw-in (45mm slip-on)
- Shutter Olympus between-lens
- Shutter speeds 1/40 or 1/200 shutter-priority AE (or full automatic)
- Viewfinder albada with separate settings window
- Exposure meter selenium cell
- EV range 8-17 @ ASA 100
- ASA 25-400
- PC sync
- Hot shoe (M sync?)
- Thumbwheel winder
Overview
For quite some time I thought this was a rangefinder! I don’t know why now, it’s pretty obvious that it’s not if you look closely. It’s a shutter-priority scale/symbol focus compact with automatic eposure mode and a selenium cell meter. Nicely compact and with Olympus’ usual good build quality. Not quite small enough to fit in a pocket like the XA2, but a nice size nevertheless. In fact, it’s almost exactly the same size as the C35 and its bretheren, but with a slightly more pronounced lens.
Neat feature – the selected focus range symbol AND the aperture setting appears in a small window in the viewfinder so you can change settings while still holding the camera to your eye, framing your subject. (Wish I’d noticed this during my test roll.)
When there’s not enough light a red symbol pops up in the viewfinder and the shutter is locked. Use a flash: set to the appropriate manual f-stop for your subject distance, and the shutter sets itself to 1/40. Check distance vs. the meter/feet scale under the lens for more accuracy. The manual specifies that electronic flash should be used with the PC sync and a cord, not with the hotshoe which apparently is synced for bulbs, not speedlights. Good to know!
This underrated little shooter has a soft spot in my heart, not just for being a gem of a classic but for getting me out of a parking ticket. I happened to have it on me one day when I had to drive in to work before dawn to work on some computers. When I finished what I was working on and got back to my car I had a ticket for parking in a no parking area, only the adjacent sign that I didn’t see in the dark was faded to the point of being completely unreadable! I snapped a picture of the sign with the Trip and sent it to the SF Parking Department with a letter and a month and a half later they dismissed the ticket. I was a little worried that they would think it was fishy since it was b/w film and I printed it myself, but it all worked out. They sent the print back too.
Sidebar to the sidebar — on the way home that same day I stopped at the Golden Gate Bridge to shoot some more, and a couple of tourists got my attention to take their picture with their camera. After I took their picture another small group handed me their camera, and before I knew it I was there for twenty minutes as tourist after tourist asked me to take a picture of them with their camera! Eventually I just had to leave!
Repairs
Quick and dirty light seal replacement on the hinge with self-adhesive black felt, I didn’t see any other seals frankly but added a small strip on the door on the latch side for good measure. Otherwise very clean.
Tips & Tricks
Back opens with a catch on the side of the camera, not with the lifting of the rewind knob. Also, a slip-on cap is recommended for preserving the selenium cell. I don’t have one that will stay on, however.
Related Links
- Here’s the Manual for you (PDF)
