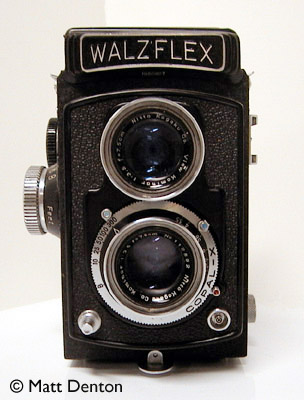
- Produced mid-50s Walz Camera Co., Japan
- Film type 120
- Picture size 6cm x 6cm
- Weight 2lbs, 3.4oz (1kg, 3.6g)
- Lens (taking) coated 3-element Nitto Kogaku Kominar 75mm f3.5 (stops to f22)
- Filter size 36mm push-on
- Focal range 3.3′ to infinity
- Shutter Copal X
- Shutter speeds B, 1/10, 1/25, 1/50, 1/100, 1/300
- Viewfinder TLR
- Exposure meter none
- Auto film counter
- Self-timer
- PC sync connection, accessory shoe
Overview
The Walzflex was one of many largely Rolleiflex-inspired Japanese TLRs that came out in the mid-Fifties (Beautyflex, Toyocaflex, etc. etc.) when amateur medium format was booming, if you can imagine such a thing now. Kind of like digital cameras are the big thing today, try using your fancy $500 7 megapixel plastic camera in fifty years (or ten! or five!). The instruction sheet bills this as a ‘family camera’, and I’m wondering how many average families now have members that would be able to spool and shoot 120 film regularly for snapshots. On the other hand I can’t picture millions of Americans using the Argus C3 either. Even better, the instructions are so minimal that it’s like everyone would already know how to use a TLR. Maybe they did. We are talking about people who really dialed telephones, turned knobs on TVs, drove cars with manual transmissions and scaled their own fish…
Anyway, this heavy-duty – but probably average qualtity at the time – camera came to me with its ragged original box and warranty card, and a leather everready case in excellent shape. The box indicates that this particular sample originally came as a set with a flash module. It’s well-made and reminds me very much of my Ikoflex for fit and finish, though I think this camera is a bit sexier. Something about the ease of which you can open and close the finder hood makes me think that a lot of thought went into the design of this little cutie.
Here’s my chance to mention that I think three element lenses (aka ‘triplets’) are underrated. Ever heard of a Kominar lens? Me either. But this lens is pin-sharp. You can’t tell from the sample because it’s scanned from a proof sheet, but on the negative you can read the lettering on the Argus and Kodak lenses, I kid you not. Hand-held with flash, f/11. Awesome.
Repairs
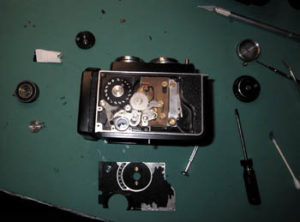
Shutter is works fine except at 1/10 where it hangs open a while (it’s just confused, it thinks it’s 10 seconds instead of 1/10), common with these old TLRs. Frequently it’s a gummy slow-speed mechanism or weak spring. The leatherette (?) is flaking off on one side of the camera, unless it was taken off for an attempted repair, possibly. Oh yes, the automatic frame counter isn’t working (won’t reset) so I can’t run any film through it till I fix it, or at least not properly. No red window, for once a problem not to have it! I took it partially apart and cleaned the lenses thoroughly, as well as the viewfinder screen and the mirror, which is in somewhat poor shape but could be easily replaced if I thought it was necessary. I also cleaned up the metal and leather outside, looks pretty good except where it’s flaking off. FOLLOWUP: Man I screwed this one up good. I took apart the side where the wind mechanism is and found that there were some parts that were simply worn from use, notably the rather questionable mating connection between the wind knob and the wind mechanism. After cleaning the mechanisms and making a couple minor adjustments inside, I thought that I could help the connection be more solid by tighening the screw harder, and – you guessed it – overtightened to the point where the head broke off. Now the shaft would have to be drilled out and a new screw found. My choices: display camera, get a parts camera, use this AS a parts camera, or – what I think I’ll do since I like it – Frankenstein this baby.

Repair Extra Credit:
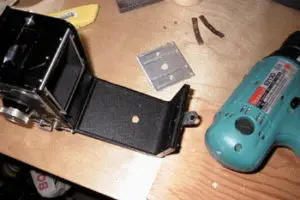
This is to go down as my most creative repair. I used a trick I learned from a woodworking magazine to get the broken screw out: I filed a notch in the protruding bit with a needle file (long live Radio Shack!), then screwed it out carefully. I bought the narrowest replacement screw and nut I could find at the hardware store (long live Pini Hardware!) and bored out the length of the wind mechanism with a drill (long live Makita!). I had to file down the head to get it to fit, which I did by putting the screw in the drill and spinning the head on a file. I put a tiny piece of folded brass in the spot where the mating surfaces were worn before screwing it all back together. I then drilled a 3/8″ hole (starting with a smaller hole & working up, with a wood block behind for protection) through the very center of the pressure plate and camera back. I carefully de-burred the edges with a rounded needle file and some steel wool, and touched up the hole in the camera back with a flat black laquer pen (long live Micro-tools!). THEN, I removed a red window from my fairly useless Shur-shot D6 and glued it inside the back door. So what could have been a pretty little piece of junk is now a beautiful user!
One of my favorites at that.

Tips & Tricks
Note that the instruction sheet (see below) says to line up the arrows on the film with the ‘white dot’ but on this particular camera the dots are actually red. Minor point but could be confusing. Then you close the back, push in the button in the center of the wind knob and wind on till the counter sets to ‘1’ and you’re ready for the first exposure.
Related Links
- The manual is on my Manuals page – I scanned it myself just for you! (zip format)
- Medium Format Page comes through again for me
- More Walzflex surgery
